As some of you are familiar, Autodesk Labs is a free website Autodesk created to explore and develop technology for you, the user of Autodesk software: http://labs.autodesk.com/
Recently, they have made eTransmit for Revit available, allowing you to:
1) Copy and detach a Revit model and associated files to a single folder for internet transmission. T
2) Locate dependent files automatically and include them in the transmittal folder, reducing the possibility of error.
3) Choose to include related dependent files such as linked Revit models, CAD files, DWF markups, decal images, and external keynote files.
4) Transmit models that are using file-based worksharing or server-based worksharing.
Learn more at: http://labs.autodesk.com/utilities/revit_etransmit/
Remember, this technology preview will only be available until December 31, 2011!
Tuesday, July 5, 2011
Monday, May 23, 2011
Revit Structure 2012 Visual Improvements: Analytical model
Many improvements have been made to Revit Structure 2012, including the visual enhancements of the analytical model. Although it continues to be built at the same time as the physical representation of the model is being created, now, the analytical model can be viewed separated.

We now have an added command in the View Control bar, a visibility specifically the analytical model:

This will now only show the analytical mode without having to use the Visibility/Graphics dialog. Also, the analytical flooring will now highlight the whole face of the element, instead of just the outline of the element:

However, you CAN go into the Visibility/Graphics dialog box and find a new tab for the Analytical model!

Work more efficiently with the analytical prtion of the Revit Structure model!
Friday, May 13, 2011
Learn about the Basics of Revit Parameters
Written by David Kaldy
There are 3 main types of Parameters as well as 3 subtypes, or ways the main Parameters are executed within a Project or Family.
The 3 main Parameter types are:
1. Family Parameters – Non schedulable, and do not appear in tags or schedules. These are typically used as visibility Parameters, as well as dimensional values that do not need to be scheduled.
2. Shared Parameter – Established from a Shared Parameter file, are associated only within the Families that utilize the Shared Parameter (unless the same Shared Parameter is also added as a Project Parameter), and can be viewed in schedules and tags.
3. Project Parameters – Established within a Project, which add Parameters to entire object categories and can be used in schedules, but cannot be used in tags. Project Parameters can be generated from Shared Parameters and cannot be added to Families.
The 3 subtypes, all of which can be made from any of the 3 main Parameter types:
1. Type – Appear in the Type Properties palette of elements and apply to all Instances of an element within a Project.
2. Instance – Appear in the Properties palette and apply to only currently selected elements in a Project.
3. Reporting (Instance) - Used to reference and display measurements within Families. Note: Can only be added in the Family Editor. These can be set up as Family or Shared Parameters.
A couple of notes about Shared Parameters:
-The Shared Parameter file can be created within a Project or a Family.
-Ensure the use of one Shared Parameter file. This helps with reducing duplicated Shared Parameters with the same name. If there are duplicate Shared Parameters (which can also occur from making a new Shared Parameter file every time a Shared Parameter is needed) then this can potentially cause duplicate Parameter fields to show up in schedules, and tags may not function correctly.
-Some Manufacturers add Shared Parameters to their content. It is best practice to swap out these Shared Parameters with Shared Parameters that you made in your Shared Parameter file, prior to loading that Family into a Project.
Friday, May 6, 2011
Revit Architecture Suite 2012 Upgrade: Feedback from a Client
I wanted to forward my thoughts so-as to help others going forward with Revit Architecture Suite 2012.
My thanks to NVIDA, PNY, Newegg, Microsoft, Apple, and Autodesk for I tried their patience as they worked with me through various issues required for this year's upgrade.
Original Specifications:
- Apple Mac Pro 3.1 2-2.8ghz XENON E5462 - 6gig RAM - 8800gt video
- 2 hd's - 1T mac o.s. 10.5.7, 2T Vista 64 bit SP2
- Revit Arch Suite 2011 with files to 100meg in size
Suggestions:
- Use Autodesk website for correct video drivers (makes a huge difference)
- Once files are over 100 meg in size, forget it - also renderings only to 300dpi max and file size to 2meg
- Get use to system crashes due to known video card issues - so save often!
- It will take a long time to open Revit and update files from previous versions
- Big Tip:
Place all of your content on a separate HD and load Families as you need them. Once you have finished your model, purge content for it will save you ALOT of time rendering - Do not even try to load Autodesk 2012 anything with these specifications - it isn't anywhere, anything close to a productive environment. RAM is the biggest thing the 8gig listed as a minimum has to be a mistake - try 16gig or better
New Specifications:
- Same Mac Pro 3.1 2-2.8ghz xenon E5462
- Upgrade to 24 gig ram - PNY Quatro 4000 video
- Upgrade to Windows 7 64-bit
- Upgrade Revit Architecture Suite 2012
Note: Bootcamp needs Vista to 7 utility and PNY Quatro needs a driver from the manufacturer.
Improvements:
- Files larger than 200meg run fast
- Renderings done in 1/8 the time or better
- No system crashes with added benefit of multiple applications open i.e. Adobe Photoshop
Investment: Autodesk renewal $725; upgrades listed $1500; original Mac Pro $2800 = $5025
Lessons Learned:
- If you are doing anything beyond VERY simple small file models in Revit, you will need a professionally build computer (Call HP or Apple)
- There is no such thing as too much RAM, so forget about the 8meg RAM minimum, you really need 16meg RAM minimum
- High End workstation cards are worth every penny!!!! Gaming cards are just not designed for what Revit does; check Autodesk for support drivers and you figure this out very quickly - so in short you must now pay to play or rather work (Call Newegg for upgrades)
I also want to thank Joanna for her patience and ability to listen, and then deliver Autodesk Products with exceptional service vital for my company's success.
*The information above has been given by Ross Billiter - AIA, ALA, NCARB of Ross Billiter Architect - Architechstyles, PLLC. Any views or opinions presented in this blog post are solely those of the author and do not necessarily represent those of Advanced Solutions, Inc.*
Ross Billiter - AIA, ALA, NCARB
Ross Billiter Architect - Architechstyles, PLLC
Durham, NC
www.architechstyles.com
www.rossbilliterarchitect.com
Thursday, April 14, 2011
Why Won't My Power Loads Calculate?!?!?!?
A client came to me this week with an issue. He is working with Color Scheme Legends in Revit MEP. He created a Color Scheme Legend for Lighting Loads and it works fine. However, when checking for the Power Loads, the Color Scheme Legend has a zero calculation!
I knew this had worked for me in the past, but when I tried to recreate the issue in a new file, low and behold, my Power Load calculated as zero as well! Jay Ayala to the rescue! Sometimes 2 heads are better than one...although I did slap my palm to my forehead that I didn't think if checking this setting myself...Watch the video below:
For some reason, the option is no longer checked on by Default, but checked off...
Wednesday, April 6, 2011
Security software Norton 360, by Symantec, is incompatible with ALL Autodesk software
One of our Technical Suppose Specialists, Jeffrey Maffeo, was currently troubleshooting with Autodesk on a recent case. Apparently, Autodesk reports that the security software Norton 360, by Symantec, is incompatible with ALL Autodesk software.
There are currently two options:
OPTION 1
Unregister a Norton file, buShell.dll. Be aware that unregistering buShell.dll disables the Norton 360 backup context menu options, backup status overlay icons, and Norton Backup Drive.
Note: Your computer may be restarted more than once, and you will be provided the instructions on how to reinstall your Norton product. After you reinstall your Norton product, run LiveUpdate and install all the available updates. Run LiveUpdate again until there are no updates available, and then restart the computer.
"The customer has AutoCAD LT 2011 & 2012. The software would work fine upon first use after installation. However, upon second or subsequent uses, AutoCAD LT would become unresponsive in either version when trying to open any drawing, providing no error or clue to the problem whatsoever.
After exhaustive troubleshooting, which included a “clean” uninstall of ALL Autodesk products in selective startup mode, I contacted Autodesk Partner Support who had the answer quickly. Needless to say, I was very surprised with their answer, but I and the customer were very pleased to finally have a resolution to the problem."
There are currently two options:
OPTION 1
Unregister a Norton file, buShell.dll. Be aware that unregistering buShell.dll disables the Norton 360 backup context menu options, backup status overlay icons, and Norton Backup Drive.
STEP 1
Turn off Norton Tamper Protection
1) Start Norton 360. Click Settings.
2) In the Settings window, under Quick Controls, uncheck Norton Tamper Protection.
3) In the Security Request window, from the drop down menu, select a duration and click OK. Click Close.
STEP 2
Unregister buShell.dll
1) Navigate to the following folder: C:\WINDOWS\system32
2) Depending on your version of Windows, do one of the following:
- In Windows 7 or Vista: Locate and right-click the cmd file, and then click Run as administrator.
- In Windows XP: Locate and double-click the cmd file.
3) Depending on your version of Norton 360, do one of the following:
- For Norton 360 Standard Edition in Windows 7/Vista/XP 32-bit: Type the following text, and then press Enter.cd C:\Program Files\Norton 360\Engine\5.*
- For Norton 360 Standard Edition in Windows 7/Vista 64-bit: Type the following text, and then press Enter.cd C:\Program Files (x86)\Norton 360\Engine64\5.*
- For Norton 360 Premier Edition in Windows 7/Vista/XP 32-bit: Type the following text, and then press Enter.cd C:\Program Files\Norton 360 Premier Edition\Engine\5.*
- For Norton 360 Premier Edition in Windows 7/Vista 64-bit: Type the following text, and then press Enter.cd C:\Program Files (x86)\Norton 360 Premier Edition\Engine64\5.*
4) Type the following text, and then press Enter. regsvr32 /u buShell.dll
5) In the RegSvr32 window, click OK. Exit the Command Prompt.
STEP 3
Turn on Norton Tamper Protection
1) Start Norton 360. Click Settings.
2) In the Settings window, under Quick Controls, check Norton Tamper Protection. Click Close.
OPTION 2
Note: If you downloaded your product from your service provider, you do not have a Product Key. Please skip Step 1 and continue with Step 3 below.
STEP 1
Save your Product Key
Note: You may also find your Product Key at the back of the CD sleeve, or in the confirmation email that you received from Symantec for your download purchase. Once you write down the Product Key, go to Step 2.
1) Start Norton 360. On the top of the main product window, click My Account.
2) Click Access Norton Account. Type in your email address and password for your Norton Account, then click Sign In.
Note: If you do not have a Norton Account set up already, click Get Started, complete the form, and then click Submit.
3) Under Products, click Norton 360. Write down the Product Key.
4) Sign out of your Norton Account, then continue with Step 2 below.
STEP 2
Download and run BUdump.exe
2) Click Save. Save the file onto your Windows desktop.
3) On the desktop, double-click the BUdump.exe file. Click Run. BUdump.exe will run quickly and silently.
STEP 3
Download and run the Norton Removal Tool
Note: The Norton Removal Tool uninstalls all Norton 2003 and later products, Norton 360, and Norton SystemWorks 12.0 from your computer. Before you continue, make sure that you have the installation CDs or downloaded installation files for any Norton products that you want to reinstall. If you have pcAnywhere or WinFAX, uninstall it using Add or Remove Programs before running the Norton Removal Tool. Also, if you use ACT! or WinFAX, back up those databases and uninstall those products.
2) On the Windows desktop, double-click the Norton Removal Tool icon.
3) Follow the on-screen instructions. Restart the computer.
Note: Your computer may be restarted more than once, and you will be provided the instructions on how to reinstall your Norton product. After you reinstall your Norton product, run LiveUpdate and install all the available updates. Run LiveUpdate again until there are no updates available, and then restart the computer.
Tuesday, February 1, 2011
Troubleshooting Revit to NavisWorks
Have you ever tried to Export a model to Navisworks, but none of the Instance Parameters show up once you bring it into Navisworks?
One of our Application Engineers, David Kaldy may have a solution!
Download and install the Navisworks NMC Export Utility:
Then open the Revit > go to the Addins > External Tools > Navisworks 2011.
Select the Navisworks settings… > make the following changes:

You can also experiment with going to the Interface category > Selection > Resolution (using Layer seems to work well)
Then export.
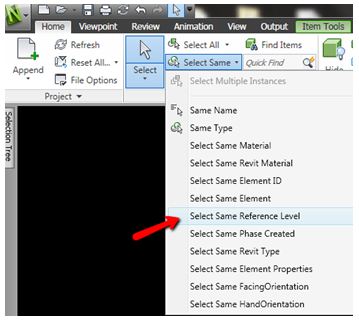
Open this file in Navisworks > select the object then Select Same > Select the appropriate setting:
For the month of February, if you "Like" us on our Advanced Solutions Facebook page, you will be entered into a contest to win 3 FREE months of PILOT Training ...
Subscribe to:
Posts (Atom)