Wednesday, September 18, 2013

Building Blocks and Puzzle Pieces is Moving!

“The only thing constant in life is change!” - François de La Rochefoucauld
 
This statement being true, we are moving the BUILDING BLOCKS AND PUZZLE PIECES blog to a new site. We’re joining forces with other industry leaders to create a “one stop shop” for all things technological in nature. The new site will include posts by other authors within the building, infrastructure and manufacturing industries, as well as a “New” technical support blog.
 
We would like to encourage you to follow us at http://blog.advancedsolutions.com/ for all of the up-to-the-minute posts, latest trends in technology and fun facts. 

You only have until October 1st before BUILDING BLOCKS AND PUZZLE PIECES will become obsolete.  Follow us today at http://blog.advancedsolutions.com/


Wednesday, March 27, 2013

Revit Catalogs: Troubleshooting Incorrect Beam Sizes

Support Question and Solution:
Provided by Tylor Zollman, Technical Support Specialist

We had a client that when inserting structural steel frames into Revit he noticed that the sizes were incorrect. We dug a little deeper and found that this was an oversight by Autodesk. However, you can simply edit the type catalog to resolve the issue. Please see the images below…

HSS – Hollow Structural Section.rfa


HSS16X4X3/16 = 1’2”?!?!
 
  1. Browse to C:\ProgramData\Autodesk\RVT 2013\Libraries\US Imperial\Structural Framing\Steel and right click on the HSS-Hollow Structural Section.txt
  2. Select properties
  3. De-select the “Read Only” check box
  4. Select Apply and then OK
  5. Now open the HSS-Hollow Structural Section.txt
  6. Find the incorrect size and change it from 14.000 to 16.000.
  7. Save the text file as the EXACT same name.

Once you have completed the above steps the sizes should be correct when inserting the family into a Revit model.

Friday, November 2, 2012

Bringing Information from Excel into Revit


Following is information and workflows for bringing information from Excel into Revit.  Multiple options, tutorial videos on most options. 

Go to Subscription Center to get the Revit Database Link Extension.  Under Downloads > Product Enhancements > Autodesk Revit DB Link 2013 (or 2012 if this is the version you are running) > Download the Extension > Close Revit and reopen Revit for the Extension to populate in the Add-Ins Tab > External Tools dropdown.


RDB Link works with Microsoft Access.

Revit DB Link video demonstration.  This is a free add-on for subscription customers.

Another video showing (although from 2010, workflow remains similar)

Import Excel into Access

------------------------------------------------------------------------------

This video outlines the (manual, but effective workflow) for linking in Excel through the ACAD file link.

------------------------------------------------------------------------------

Third Party:
I have seen individuals have luck with: Quick Table

Excel to Revit tool:

Ideate BIMLink information:
Import from Excel:

More videos about BIMLink:

Provided by: Alan DeLuce, Application Engineer - Building Solutions

Wednesday, May 9, 2012

From Autodesk: How to get your Autodesk software on a CD, DVD or USB drive

Did you know that you can still get your media on a CD, DVD or USB drive?  If you are a Subscription Customer you can request the physical media (e.g., CD, DVD, or USB—depending on the product) for the products you have licensed on your subscription contract, directly from Subscription Center. 

1) Log onto the Subscription Center, and click Get Your Upgrade in the center of the page.

2) Under Related Information on the left menu, click Request Media for:

Follow the link to continue: How to get your Autodesk software on a CD, DVD or USB drive

Saturday, April 7, 2012

Little Features in Revit 2013

There are so many blogs out there talking about the new features of Revit 2013.  This one is specific to dimensions...a small change, but something we received as a Support case just this past week.  There is now an option to select an individual segment in a multi-segment dimension chain, and delete the segment!  Watch, and I will demonstrate:


Simply hovering over the dimension thread, selecting the individual dimension and hitting the Delete key will remove it...so simple, so beautiful...

Sunday, April 1, 2012

Autodesk is no longer supporting Windows Vista

I just wanted to remind everyone that Autodesk is no longer supporting Windows Vista. That does mean that the 2013 software IS NOT compatible with Windows Vista. We have already ran into a client trying to install AutoCAD 2013 on a Vista machine and he was receiving errors that Windows has crashed.

2013 Requirements:

Wednesday, March 28, 2012

Revit To Navisworks

Through the emergence of technology the dynamic of the design process has been changed for the better. These technologies allow us to put the right tools into the right hands to create better design documents and better products for the user. Since the dawn of man we have been striving to improve our dwellings and our quality of life through technology.

In recent years there has been a pivotal change in the way contractors and construction managers coordinate their projects. Due to contract language there are positioned against the design teams, which can create a poor product for the owner. The old way of coordinating documents “the light table method” has been thrown out the window and replaced with 3D documents that can be reviewed with efficiency and speed. This new way of thinking and documenting is allowing the Architect to become the master builder they are meant to be.

This new mode of thinking called Building Information Modeling or BIM is transforming the modern Architects back into the “Master of all Trades”. With the object oriented BIM models we can now fully visualize a building and its contents in a virtual setting before anything is in place. This allows us to mitigate the large lose time changes orders before any piece of the building is erected. This allows the design team to tighten up drawings before their drawings have been signed and sealed.

Navisworks is the coordination key that brings all the BIM documentation into a like setting to be compared. It allows the users to coordinate in ways we have needed for many years.

The information below are my accounts, tips and tricks I feel can be useful for anyone starting to learn Navisworks. With over 3 years of Navisworks experience and over $250 Million in BIM projects coordinated in place I have discovered systems to simplify the process. Remember Navisworks is only as good as the information you put into it, so it is important that all information in your drawings are “validated” in some form.


A.      Exporting for Revit – “What you see is what you get”

We use the term “what you see is what you get” because when exporting from Revit the model and the state in which it is shown is how it is exported into a .NWC (Navisworks model) or 3D .DWG file from the 3D view the user is currently viewing. See example below.


In the above example the file which would be exported would contain all items shown such as exterior walls, interior walls, ceilings, structure, and etc.. The problem with exporting all construction systems in one file is once exported into Navisworks the project becomes cumbersome but this will be explained in the next section.

                When exporting from Revit keep you project simple and keep in mind you will be comparing each construction system to another so the cleaner each file the more efficient your Navisworks navigation will become and this will lessen the possibility of an error in your Navisworks clash report.

                You can define you 3D view in many ways to get the desired trade or items you would like to have coordinated.

1.       Use work sets to view certain trades with in the 3D view.

2.       Or use your phasing with work sets to view a certain trade and its correct phase of the project (see below).

Now there are two recommended ways to export information from Revit into Navisworks. The first way is to use the Navisworks NWC export tool in the add-inns tab of the Revit user interface. This method is the most widely used and recommended from Autodesk.

When exporting with the Add-Inns tool we have to double check some key items within the Navisworks exports Add-Inn tool. Once the export to Navisworks is opened select the “Navisworks Settings” button to check the current settings, please see the picture below.


Once you select the “Navisworks Settings” button the Navisworks settings for opening Revit files within Navisworks will be opened. Most of the default setting will remain the same but there are 2 important setting to make sure you check. The first is the “convert linked files” is checked if you are exporting linked files this setting is most important if you are including linked files in you export. The second setting that needs to be reviewed is the “Coordinated” this needs to be set to “Shared” to make sure our files come over in the right X, Y, Z location.

Thursday, February 9, 2012

Chicago Presentation: BIM, COBie and IFC

In Chicago, the BIM/IPD Group is making big strides promoting Building Information Modeling (BIM) and Integrated Project Delivery (IPD). Come show you interest and support this month!

"Designing Building Information Models for Building Owners"

Kristine Fallon Associates, Inc. (www.kfa-inc.com) will present a major research project on structuring Building Information Models (BIM) correctly to produce both Construction-Operations Building information exchange (COBie) and IFC Facility Management model view outputs.

Building owners are driving adoption of BIM that delivers on the promise of seamless data transfer from design through construction to operations and maintenance. However, this is technically difficult to achieve.

The US Army Corps of Engineers funded KFA's research to provide deeper insight into the possibilities, pitfalls and technology issues.

KFA will also share insights into GSA's recently published BIM Guide for Facility Management.

Advanced Solutions, Inc. (www.advsolinc.com) is sponsoring food and beverages for the event on Thursday, February23th starting at 5:30 pm at AIA Chicago's Board Room, 35 East Wacker.(www.aiachicago.org). The event is organized by the Chicago BIM/IPD Group at www.LinkedIn.com

Wednesday, July 27, 2011

To More You Know: Don't forget the FREE Stuff!!!

Autodesk Labs

Autodesk Labs provides free technology they are currently testing, not to be mistaken for beta testing.  They are relevant tools to the industry, and they look for feedback from clients to verify whether or not the tools would be good for to put out or add to existing software products, like Revit.  Project Vasari and Photofly both are on the site, and functionality from Project Vasari have been added to the Revit platform because of feedback and excitement.  

Autodesk Seek

Autodesk Seek was created to share Manufacturer specific content created in Revit to the AEC community.  Free to the AEC community, many clients have benefit from using the Revit Families up on this site.  Each Revit platform has a direct link to Autodesk Seek.  There are guidelines and technical requirements for Manufacturers.

Green Building Studio

Green Building Studio is a web-based program that comes free for clients on subscription using any of the Revit platforms or Ecotect (there may be others, but those are the ones I am familiar with). 


This program is a whole building analysis software that assists in qualification for LEED 8.1 Daylighting credit, water usage and cost, Energy Star scoring, natural ventilation potential, carbon emission reporting and more. 

Revit Extensions

All three Revit platforms have extensions available.  I find those for Revit Structure to have the most extensions that will provide an immense amount of efficiency for the client.  The Reinforcement Extension alone will help any client looking to model the rebar in more than one element at a time.  The Wood Framing extension (also beneficial for Revit Architecture), Freeze View extension, and many more are fantastic!

Monday, July 25, 2011

The More You Know: BIMAssist for Revit

Many people are familiar with the extensions for Revit from Autodesk.  For Revit Architecture, Revit MEP and Revit Structure, they have been available since June 20, 2011.  If you have not downloaded them already, I hightly recommend you do, as many of them will help you considerably. 

In additon to the extensions for Revit from Autodesk, several channel partners have also created add on tools.  Advanced Solutions has the BIMAssist Tools, available FREE to our Revit Subscription clients.  The utilities include the following:
  • Case Update
  • Door Mark Manger
  • Fire Rating Coordinator
  • Match Instance Parameters Feeatures
  • Note Block Creator
  • Room Phase Replicator
  • Room Renumber
  • Room Surface Parameter Extractor
  • Sheet Number Update
  • Space Synchronizer
  • Text Find and Replace Features
There is a short video for each utility, or you can find them on our YouTube site.  In August, we will have two webcasts during which ASI Application Engineer Brenda Thomas will demonstrate each of the twelve productivity enhancing utilities of BIMAssist™ for Revit®.

Optimize Your Productivity with BIMAssist for Revit on Tuesday, August 2, 2011

or

Optimize Your Productivity with BIMAssist for Revit on Wednesday, August 10, 2011

About Advanced Solutions, Inc.
Advanced Solutions, Inc. is an award-winning Autodesk Gold Partner in Manufacturing, Architecture, Engineering and Construction, Authorized Autodesk Training Center (ATC) and Authorized Autodesk Consulting Services Partner (CSP). For more than 24 years, the company has focused its business model on helping customers realize industry-leading return on investment with their 2D and 3D design software. Beyond the box of software, Advanced Solutions helps customers gain a competitive advantage through innovative design software work flows, enabling customers to realize higher revenues and improving their operational efficiency. For additional information about Advanced Solutions, Inc., please visit our website at www.AdvancedSolutions.com.

Autodesk, AutoCAD, Civil 3D and ATC are registered trademarks of Autodesk, Inc., in the U.S. and/or other countries. All other brand names, product names, or trademarks belong to their respective holders.

Tuesday, July 5, 2011

eTransmit is Now Available on Autodesk Labs!

As some of you are familiar, Autodesk Labs is a free website Autodesk created to explore and develop technology for you, the user of Autodesk software: http://labs.autodesk.com/

Recently, they have made eTransmit for Revit available, allowing you to:

1) Copy and detach a Revit model and associated files to a single folder for internet transmission. T

2) Locate dependent files automatically and include them in the transmittal folder, reducing the possibility of error.

3) Choose to include related dependent files such as linked Revit models, CAD files, DWF markups, decal images, and external keynote files.

4) Transmit models that are using file-based worksharing or server-based worksharing.

Learn more at: http://labs.autodesk.com/utilities/revit_etransmit/

Remember, this technology preview will only be available until December 31, 2011! 

Monday, May 23, 2011

Revit Structure 2012 Visual Improvements: Analytical model

Many improvements have been made to Revit Structure 2012, including the visual enhancements of the analytical model.  Although it continues to be built at the same time as the physical representation of the model is being created, now, the analytical model can be viewed separated.


We now have an added command in the View Control bar, a visibility specifically the analytical model:


This will now only show the analytical mode without having to use the Visibility/Graphics dialog.  Also, the analytical flooring will now highlight the whole face of the element, instead of just the outline of the element:


However, you CAN go into the Visibility/Graphics dialog box and find a new tab for the Analytical model!


Work more efficiently with the analytical prtion of the Revit Structure model! 

Friday, May 13, 2011

Learn about the Basics of Revit Parameters

Written by David Kaldy

There are 3 main types of Parameters as well as 3 subtypes, or ways the main Parameters are executed within a Project or Family.

The 3 main Parameter types are:

1.    Family Parameters – Non schedulable, and do not appear in tags or schedules. These are typically used as visibility Parameters, as well as dimensional values that do not need to be scheduled.

2.    Shared Parameter – Established from a Shared Parameter file, are associated only within the Families that utilize the Shared Parameter (unless the same Shared Parameter is also added as a Project Parameter), and can be viewed in schedules and tags.

3.    Project Parameters – Established within a Project, which add Parameters to entire object categories and can be used in schedules, but cannot be used in tags. Project Parameters can be generated from Shared Parameters and cannot be added to Families.

The 3 subtypes, all of which can be made from any of the 3 main Parameter types:

1.    Type – Appear in the Type Properties palette of elements and apply to all Instances of an element within a Project.

2.    Instance – Appear in the Properties palette and apply to only currently selected elements in a Project.

3.    Reporting (Instance) - Used to reference and display measurements within Families. Note: Can only be added in the Family Editor. These can be set up as Family or Shared Parameters.

A couple of notes about Shared Parameters:

-The Shared Parameter file can be created within a Project or a Family.

-Ensure the use of one Shared Parameter file. This helps with reducing duplicated Shared Parameters with the same name. If there are duplicate Shared Parameters (which can also occur from making a new Shared Parameter file every time a Shared Parameter is needed) then this can potentially cause duplicate Parameter fields to show up in schedules, and tags may not function correctly.

-Some Manufacturers add Shared Parameters to their content. It is best practice to swap out these Shared Parameters with Shared Parameters that you made in your Shared Parameter file, prior to loading that Family into a Project.

Friday, May 6, 2011

Revit Architecture Suite 2012 Upgrade: Feedback from a Client

I wanted to forward my thoughts so-as to help others going forward with Revit Architecture Suite 2012.

My thanks to NVIDA, PNY, Newegg, Microsoft, Apple, and Autodesk for I tried their patience as they worked with me through various issues required for this year's upgrade.


Original Specifications:

  • Apple Mac Pro 3.1 2-2.8ghz XENON E5462 - 6gig RAM - 8800gt video
  • 2 hd's - 1T mac o.s. 10.5.7, 2T Vista 64 bit SP2
  • Revit Arch Suite 2011 with files to 100meg in size


Suggestions:

  • Use Autodesk website for correct video drivers (makes a huge difference)
  • Once files are over 100 meg in size, forget it - also renderings only to 300dpi max and file size to 2meg
  • Get use to system crashes due to known video card issues - so save often!
  • It will take a long time to open Revit and update files from previous versions
  • Big Tip:
    Place all of your content on a separate HD and load Families as you need them. Once you have finished your model, purge content for it will save you ALOT of time rendering
  • Do not even try to load Autodesk 2012 anything with these specifications - it isn't anywhere, anything close to a productive environment. RAM is the biggest thing the 8gig listed as a minimum has to be a mistake - try 16gig or better


New Specifications:

  • Same Mac Pro 3.1 2-2.8ghz xenon E5462
  • Upgrade to 24 gig ram - PNY Quatro 4000 video
  • Upgrade to Windows 7 64-bit
  • Upgrade Revit Architecture Suite 2012


Note: Bootcamp needs Vista to 7 utility and PNY Quatro needs a driver from the manufacturer.


Improvements:

  • Files larger than 200meg run fast
  • Renderings done in 1/8 the time or better
  • No system crashes with added benefit of multiple applications open i.e. Adobe Photoshop


Investment: Autodesk renewal $725; upgrades listed $1500; original Mac Pro $2800 = $5025


Lessons Learned:

  • If you are doing anything beyond VERY simple small file models in Revit, you will need a professionally build computer (Call HP or Apple)
  • There is no such thing as too much RAM, so forget about the 8meg RAM minimum, you really need 16meg RAM minimum
  • High End workstation cards are worth every penny!!!! Gaming cards are just not designed for what Revit does; check Autodesk for support drivers and you figure this out very quickly - so in short you must now pay to play or rather work (Call Newegg for upgrades)


I also want to thank Joanna for her patience and ability to listen, and then deliver Autodesk Products with exceptional service vital for my company's success.


*The information above has been given by Ross Billiter - AIA, ALA, NCARB of Ross Billiter Architect - Architechstyles, PLLC. Any views or opinions presented in this blog post are solely those of the author and do not necessarily represent those of Advanced Solutions, Inc.*


Ross Billiter - AIA, ALA, NCARB

Ross Billiter Architect - Architechstyles, PLLC

Durham, NC

www.architechstyles.com

www.rossbilliterarchitect.com

Thursday, April 14, 2011

Why Won't My Power Loads Calculate?!?!?!?

A client came to me this week with an issue.  He is working with Color Scheme Legends in Revit MEP.  He created a Color Scheme Legend for Lighting Loads and it works fine.  However, when checking for the Power Loads, the Color Scheme Legend has a zero calculation! 

I knew this had worked for me in the past, but when I tried to recreate the issue in a new file, low and behold, my Power Load calculated as zero as well!  Jay Ayala to the rescue!  Sometimes 2 heads are better than one...although I did slap my palm to my forehead that I didn't think if checking this setting myself...Watch the video below:


For some reason, the option is no longer checked on by Default, but checked off...

Wednesday, April 6, 2011

Security software Norton 360, by Symantec, is incompatible with ALL Autodesk software

One of our Technical Suppose Specialists, Jeffrey Maffeo, was currently troubleshooting with Autodesk on a recent case. Apparently, Autodesk reports that the security software Norton 360, by Symantec, is incompatible with ALL Autodesk software. 

"The customer has AutoCAD LT 2011 & 2012.  The software would work fine upon first use after installation.  However, upon second or subsequent uses, AutoCAD LT would become unresponsive in either version when trying to open any drawing, providing no error or clue to the problem whatsoever. 

After exhaustive troubleshooting, which included a “clean” uninstall of ALL Autodesk products in selective startup mode, I contacted Autodesk Partner Support who had the answer quickly.  Needless to say, I was very surprised with their answer, but I and the customer were very pleased to finally have a resolution to the problem."

There are currently two options:

OPTION 1
Unregister a Norton file, buShell.dll. Be aware that unregistering buShell.dll disables the Norton 360 backup context menu options, backup status overlay icons, and Norton Backup Drive.
 
STEP 1

Turn off Norton Tamper Protection

1) Start Norton 360. Click Settings.
2) In the Settings window, under Quick Controls, uncheck Norton Tamper Protection.
3) In the Security Request window, from the drop down menu, select a duration and click OKClick Close.
 
STEP 2

Unregister buShell.dll

1) Navigate to the following folder: C:\WINDOWS\system32
2) Depending on your version of Windows, do one of the following:
  • In Windows 7 or Vista: Locate and right-click the cmd file, and then click Run as administrator.
  • In Windows XP: Locate and double-click the cmd file.
3) Depending on your version of Norton 360, do one of the following:
  • For Norton 360 Standard Edition in Windows 7/Vista/XP 32-bit: Type the following text, and then press Enter.
    cd C:\Program Files\Norton 360\Engine\5.*
  • For Norton 360 Standard Edition in Windows 7/Vista 64-bit: Type the following text, and then press Enter.
    cd C:\Program Files (x86)\Norton 360\Engine64\5.*
  • For Norton 360 Premier Edition in Windows 7/Vista/XP 32-bit: Type the following text, and then press Enter.
    cd C:\Program Files\Norton 360 Premier Edition\Engine\5.*
  • For Norton 360 Premier Edition in Windows 7/Vista 64-bit: Type the following text, and then press Enter.
    cd C:\Program Files (x86)\Norton 360 Premier Edition\Engine64\5.*
4) Type the following text, and then press Enter. regsvr32 /u buShell.dll
5) In the RegSvr32 window, click OKExit the Command Prompt.
 
STEP 3

Turn on Norton Tamper Protection

1) Start Norton 360. Click Settings.
2) In the Settings window, under Quick Controls, check Norton Tamper ProtectionClick Close.
 
OPTION 2
 
Note: If you downloaded your product from your service provider, you do not have a Product Key. Please skip Step 1 and continue with Step 3 below.
STEP 1

Save your Product Key

Note: You may also find your Product Key at the back of the CD sleeve, or in the confirmation email that you received from Symantec for your download purchase. Once you write down the Product Key, go to Step 2.
1) Start Norton 360. On the top of the main product window, click My Account.
2) Click Access Norton AccountType in your email address and password for your Norton Account, then click Sign In.
Note: If you do not have a Norton Account set up already, click Get Started, complete the form, and then click Submit.
3) Under Products, click Norton 360Write down the Product Key.
4) Sign out of your Norton Account, then continue with Step 2 below.
 
STEP 2

Download and run BUdump.exe

1)Click the button to download BUdump.exe. DOWNLOAD

2) Click Save. Save the file onto your Windows desktop.
3) On the desktop, double-click the BUdump.exe file. Click Run. BUdump.exe will run quickly and silently.
 
STEP 3

Download and run the Norton Removal Tool

Note: The Norton Removal Tool uninstalls all Norton 2003 and later products, Norton 360, and Norton SystemWorks 12.0 from your computer. Before you continue, make sure that you have the installation CDs or downloaded installation files for any Norton products that you want to reinstall. If you have pcAnywhere or WinFAX, uninstall it using Add or Remove Programs before running the Norton Removal Tool. Also, if you use ACT! or WinFAX, back up those databases and uninstall those products.

1) Download the Norton Removal Tool. Save the file to the Windows desktop. DOWNLOAD

2) On the Windows desktop, double-click the Norton Removal Tool icon.
3) Follow the on-screen instructions. Restart the computer.

Note: Your computer may be restarted more than once, and you will be provided the instructions on how to reinstall your Norton product. After you reinstall your Norton product, run LiveUpdate and install all the available updates. Run LiveUpdate again until there are no updates available, and then restart the computer.

Tuesday, February 1, 2011

Troubleshooting Revit to NavisWorks

Have you ever tried to Export a model to Navisworks, but none of the Instance Parameters show up once you bring it into Navisworks?

One of our Application Engineers, David Kaldy may have a solution!  

Download and install the Navisworks NMC Export Utility:

Then open the Revit > go to the Addins > External Tools > Navisworks 2011.

Select the Navisworks settings… > make the following changes:


You can also experiment with going to the Interface category > Selection > Resolution (using Layer seems to work well)
Then export.

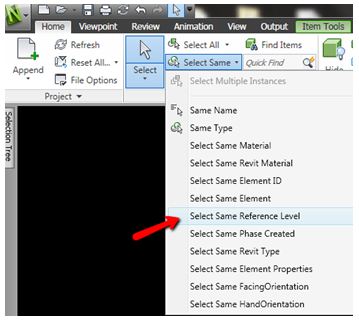
Open this file in Navisworks > select the object then Select Same > Select the appropriate setting:


Don't forget to sign up for our newsletter!  Our January 2011 Newsletter is out!

For the month of February, if you "Like" us on our Advanced Solutions Facebook page, you will be entered into a contest to win 3 FREE months of PILOT Training ...

Monday, January 24, 2011

Defining Parameters of Mechanical Equipment

Have you ever wondered what the Flow Configuration vaules really mean and what each value type represents?  The Flow Configuration defines whether or not a Connection will be the defining factor of Flow for attached equipment.  The two used most often is the Preset and Calculated. 


When a Supply System is created with the Diffusers and the VAV Box, the Flow inherited in each Diffuser can be used to calculate the Flow upstream to the VAV Box.  The Flow Configuration for each Diffuser will be Preset, meaning the Diffusers will be the defining elements of the connected elements, namely, the VAV box they are connected to.  The Flow Configuration for the VAV Box will be defined as Calcuate, as the Flow value is calculated based on the Diffusers connected to it. 


The calculated Flow value of the VAV Box will update as the Diffuser Flow value changes.

Simple and useful.  More questions?  Please feel free to comment!

Where did this thought come from?  Well, Autodesk has a wonderful Blog called Inside-the-System.  A while back, they had two parts explaining, in more depth, what I discussed above:


Learn to fish...watch the videos...

Tuesday, January 18, 2011

Where are the Project Parameters I added in my last Project?

As you begin working on projects in Revit, your first project will have additions that you will probably want to use over and over again in each additional project.  The best way to add the modifications is to transfer them to your existing template before starting your next project.  Using the Transfer Project Standards tool, numerous changes can be transfered, including Project Parameters, View Templates, Wire Sizes and Dimension Styles.

Note: Make sure you have the project that you just finished open behind the existing template file. 

On the Manage tab>Transfer Project Standards


Keep the items you want trasfered checked on.  There are so many, if you only want a few items transfered, select the 'Check None' button first, and then manually add the desired items.


Click OK until you are back at the original screen and save the template for future use.

Monday, January 17, 2011

Troubleshooting: Why isn't my Pipe Filter Working?

Have you been diligently creating Filters for your Pipes?   Are you hitting a wall when you try to make a Filter on a Pipe connected to a System that you want to be a different color, like a Vent Pipe that is connected to a Sanitary System connection?  Well, there is a simple answer:Filter List Order Makes a Difference!!!

The order that Filters are listed in the Visibility/Graphics Override, Filters tab provides an additional display control. Filters are ranked by the order they appear on the list. Filters higher on the list have display priority over all filters listed below them. If the Pipe you selected to change has not changed, we need to move the newly created Pipe Filter above the System Filter the Pipe is connected to on the list. 


Note the blue Pipe connected to the Hot Water connection:


There are two Filters already assigned to the horizontal Pipe.  However, the System Filter is above the new Pipe Filter we created, hindering the change.  

1. Type in VV or VG to go back to the Visibility/Graphics Overrides dialog > click the Filter tab.


2. Click the Pipe Filter > click the Up button near the bottom of the dialog to move the new Pipe Filter listing above the original Filter listing > click OK to exit the Visibility/Graphics dialog.


Note that now the horizontal pipe is magenta, exactly what we wanted.